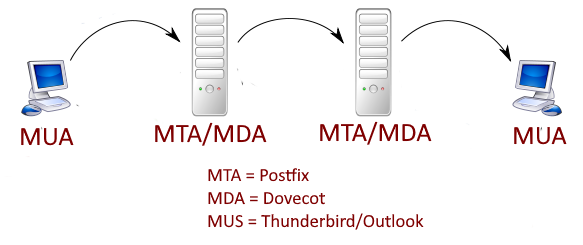
This is something I've done more than a few times and it always seems to take more time and energy than it should. There are so many choices on how to serve your data, what to use as an MTA and don't even get me started on delivery choices. In this article I will be setting up postfix as a mail transfer/transport agent (MTA) and dovecot as a mail delivery agent (MDA) on Ubuntu 20.04, it should work on any Ubuntu version above 17.04. You will be free to use any software you like as a mail user agent (MUA) to read and send email, e.g. Outlook.
Before beginning on this journey make sure you have administrator rights on the machine you want to setup as an emal server. Whether that is root access or sudo rights doesn't matter but without you will not be able to perform the necessary actions. If all you have is root access then running the commands with sudo should still work but you can omit sudo from the commands if you like.
Hostname
The absolute first thing to do is set the hostname for the machine. This is actually fairly simple but this is just the absolute minimum for getting email working. There are a lot of things that will need to be done should you add other services to the host but thats not important right now. To set the hostname, assuming the system's fqdn (fully qualified domain name) is mail.mydomain.com run the following:
sudo hostnamectl set-hostname mail.mydomain.com
And that's it. That was easy, wasn't it? The bad news is we are just getting started.
DNS
It's always DNS, even when it's not
The first step in running an email server is to configure the hostname and DNS properly. Not only will the email not flow it could also be marked as spam. The individual records that need to be addressed are A/AAA, mx, PTR, and TXT (spf, dkim, & DMARC). It isn't too bad when you break it down to small individual pieces so don't worry too much, the important thing is to get the mx and PTP records set then we will work on the others.
While it is not absolutely necessary to have a static public IP address, many email providers will mark emails as spam if the IP address changes. If at all possible I would recommend getting a static public IP address. You are typically given one when you sign up for a VPS, you might be able to get one from your ISP if you want to host on prem, and you can get them from the cloud service providers.
It seems like there are as many different DNS configuration interfaces as there are nameservers. Because there is no why to know how your nameserver admins DNS I will tell you what the record needs to contain and hopefully it makes sense when editing. LIke before let's continue to assume the server is named mail.mydomain.com at public IP address 11.22.33.44. As mentioned earlier, the first record needed is the "A" record, followed by the mail or "mx" record
A	mail.mydomain.com	11.22.33.44
mx	@	mail	10
The A record is just telling the world what IP address should be associated with the machine name mail.mydomain.com, this could be a web server or email server or some random machine on the internet.
The mx record is telling us what host is providing mail receiving services (mail) for the mydomain.com domain (@) and the priority (or preference) of that server (10).
SPF/DMARC/DKIM
SPF tells other mx hosts who can be sending email from the mydomain.com domain.
TXT @ "v=spf1 ip4:11.22.33.44 -all"DMARC set the policy of what receiving email hosts should do when the SPF and/or DKIM checks fail.
TXT _dmarc v=DMARC1\;p=reject\;rua=mailto:postman@mydomain.com\;ruf=mailto:postman@mydomain.com\;rf=afrf\;pct=100This DMARC policy tells receiving hosts the protocol version is "DMARC1" then to reject all emails that fail the check then to send an aggregate and forensic report to postman@mydomain.com in the Authentication Failure Reporting Format (afrf) for all emails sent by this host (pct=100).
As to dkim, we will install and configure that once postfix and dovecot have been installed and configured.
Let's Encrypt
A modern email server absolutely needs to have the data sent encrypted and that's done with SSL. You can purchase a certificate from a certificate authority (CA) or get them from Let's Encrypt. I personally don't like paying for things I can get for free so let's see what we need to do to get the SSL certs ready for postfix and dovecot.
The first thing you need to do is install certbot. It's the program that will handle all the heavy lifting in order to get the cert. At the time of this writing certbot was no longer available as an apt package for Ubuntu so I installed the snap (I am not a fan of snaps but that's a topic that I won't get into here). If you have previously installed certbot on the machine in question you must uninstall it prior to running the symbolic link command.
First ensure your version of snap is up to date:
sudo snap install core; sudo snap refresh core
sudo snap install certbot --classic
sudo ln -s /snap/bin/certbot /usr/bin/certbot
Now that certbot is installed you can request the certs from Let's Encrypt, which can be done via:
sudo certbot certonly --standalone
You will be asked a number of questions, answer how every you wish but be sure to enter your fqdn correctly, i.e. mail.mydomain.com. The nice thing about certbot is that is sets itself up to renew the certs automatically so it's pretty much run and done. You can test the renewal process by running the following:
sudo certbot renew --dry-run
The certs will be located in the following directory:
/etc/letsencrypt/live/mail.mydomain.com/
Firewall
Hopefully you have turned on the firewall for your puplic facing server. In order for your users to connect to postfix(send) and dovecot(receive) services you will need to open some ports:
sudo ufw allow 143,587,465,993/tcp
If you want to provide the option for POP3, run the following:
sudo ufw allow 110,995/tcp
You can see all the ports that are opened by dovecot by running the following (once it has been installed and configured you may want to do this):
sudo ss -lnpt | grep dovecot
Postfix
Setting up the MTA
Postfix
As mentioned previously, postfix will be the MTA I configure in this guide. Run the following command:
sudo apt install postfix -y
You will be asked the kind of installation you want, select internet site.
Next you will be asked the "mail name", often reffered to as the domain name. For this example it would be mydomain.com.
At this point you can verify the postfix version, make sure it's up and running, and see what ports are in use by running these commands.
postconf mail_version
systemctl status
sudo ss -lnpt | grep master
A handy way to see what binaries are installed with a package is the using the dpkg command. It like the swiss army knife of apt/aptitude. To see what was installed in the postfix package run the following.
dpkg -L postfix | grep /usr/sbin
DKIM (cont.)
dkim is a way to verify a cryptographic signature the email server attaches to each message it sends. I like to use opendkim for reasons as they say on reddit but to each their own. Anyway, this is how I do it...
sudo apt update && sudo apt upgrade -y #this updates packages and installs
sudo apt install opendkim opendkim-tools
Fail2ban
If you are running fail2ban on your server or plan to, this is a great way to stop internet baddies from gaining access through repeated attempts. I've discussed fail2ban previously and I'm a big fan. I don't have a internet facing host without it.
Create the filter file /etc/fail2ban/filter.d/dovecot-pop3imap.conf:[1]
[Definition] failregex = (?: pop3-login|imap-login): .*(?:Authentication failure|Aborted login \(auth failed|Aborted login \(tried to use disabled|Disconnected \(auth failed|Aborted login \(\d+ authentication attempts).*rip=`<HOST>`
Add the following to /etc/fail2ban/jail.conf:
[dovecot-pop3imap]
enabled = true
filter = dovecot-pop3imap
action = iptables-multiport[name=dovecot-pop3imap, port="pop3,imap", protocol=tcp]
logpath = /var/log/mail.log
maxretry = 20
findtime = 1200
bantime = 1200
To be continued...